
Third-Party AP Firmware License Based on OpenWiFi | Access Point OS
$30.00
-
3 Flash Methods: U-Boot TFTP, sysupgrade, MTK serial boot menu.
-
Qualcomm & MediaTek Supported: Chipset-specific procedures included.
-
No Disassembly Needed: USB or RJ45 serial port on most APs.
-
Network-Based Delivery: TFTP-based — no physical media.
- One-Command Upgrade: A single
sysupgrade -Fcommand for existing systems. -
Universal Serial Config: 115200 baud, 8N1 across all supported methods.
-
Community-Backed: Model-specific guides available on the TIP OpenWiFi wiki.
OpenWiFi Firmware Image -Your Hardware. Our Firmware. One Open Platform.
The OpenWiFi firmware image is a third-party AP firmware license based on the TIP OpenWiFi standard. Asteraix provides a ready-to-flash OpenWiFi OS image for your access points. Three installation paths are supported: U-Boot via TFTP, in-system sysupgrade, and MTK serial boot menu — whichever fits your hardware and situation. Once installed, your access point runs a fully open, cloud-manageable wireless OS — replacing whatever proprietary firmware was on the device before.
Installation can be performed via three distinct methods depending on your hardware’s current state: a fresh flash through U-Boot using TFTP (suited to Qualcomm-based APs), a non-disruptive in-place upgrade using the sysupgrade command on a running AP system, or the MTK serial boot menu for MediaTek-based platforms.
Note that the TFTP download address and exact flash commands can vary by AP model.
Three Ways to Flash OpenWiFi Firmware
Choose the method that matches your AP’s current state and hardware platform.
Click a card to jump to the full step-by-step guide.
METHOD 01
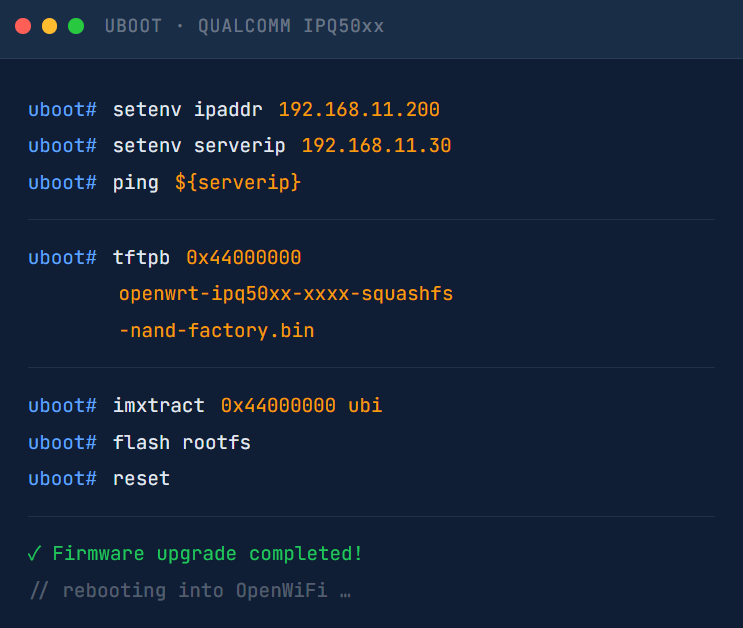
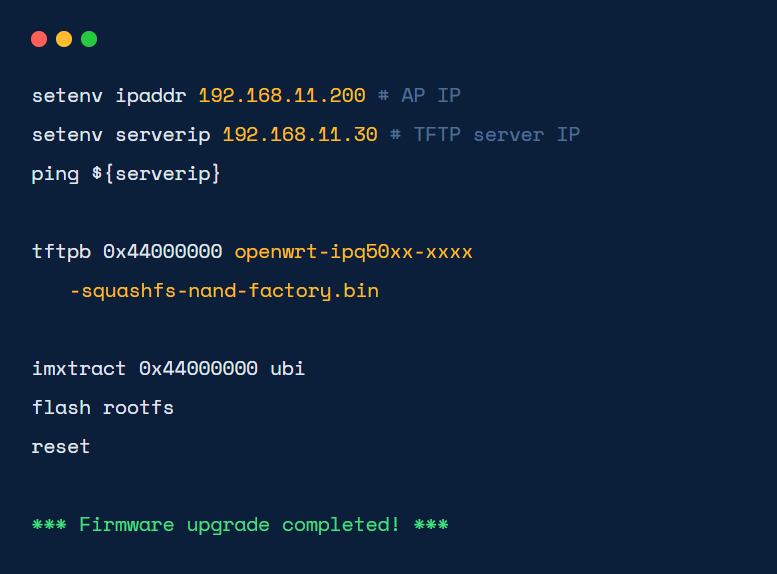
The primary method for factory-fresh APs or devices without a running OS. Uses a TFTP server to deliver the image directly into NAND flash via the U-Boot bootloader console. Suited to Qualcomm-based APs.
Step-by-Step
Full Installation Instructions
Select a method above. The complete procedure is shown below.
1
Set up a TFTP server
Place the OpenWiFi firmware binary in the TFTP root directory. Use a short, accessible filename to avoid command-line errors. Ensure the TFTP server is reachable on the same network segment as the AP.
2
Connect to the AP via serial port
Some APs expose a serial port by default — USB or RJ45. If yours does not, open the AP enclosure and connect DuPont jumper wires to the serial header on the main board. Use settings:115200 baud, 8N1. Wire TTL Tx → AP Rx, TTL Rx → AP Tx, GND ↔ GND, VCC 3.3 V ↔ VCC 3.3 V.
3
Interrupt boot to enter the U-Boot console
Power on the AP and press any key quickly when prompted to stop the autoboot countdown and drop into the U-Boot command prompt.
4
Download firmware via TFTP and flash
For Qualcomm-based APs, run the commands shown in the terminal opposite. The AP will reboot into OpenWiFi automatically.
1
Obtain the firmware .tar file
Contact Asteraix support to receive the sysupgrade-compatible image for your AP model.
2
Copy firmware to the AP
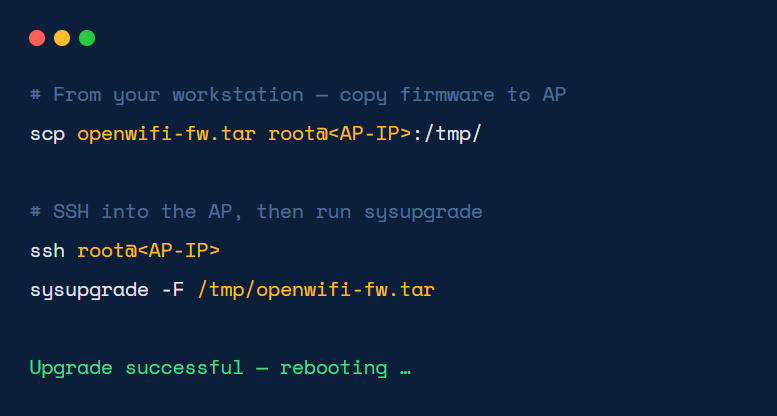
Use scp to transfer the file directly to the AP’s filesystem. Ensure SSH access is available.
3
Run sysupgrade
Execute the command shown. The -F flag forces the upgrade regardless of compatibility checks. The AP will reboot automatically.
1
Place image on TFTP server
Use a short filename such as fw.bin to avoid MTK menu input limitations.
2
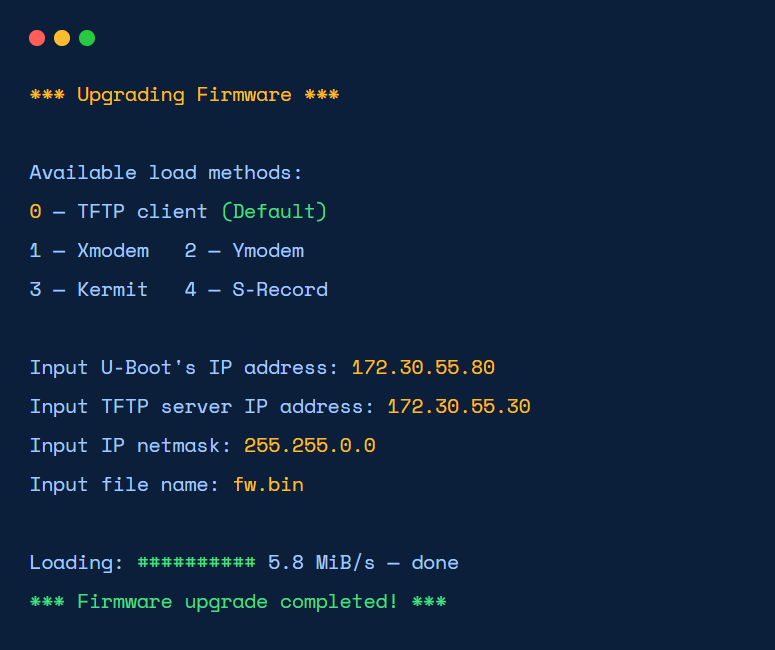
Connect via serial and enter the U-Boot boot menu
Interrupt boot to access the MTK interactive menu. Select Upgrade firmware.
3
Select TFTP load method and enter network info
Choose option 0 – TFTP client. Enter the AP IP, TFTP server IP, netmask, and filename (fw.bin).
4
Wait for download and flash to complete
The AP transfers the image, writes it to flash, and reboots into OpenWiFi automatically.
Serial Port Connection Guide
Required for U-Boot and MTK serial-menu methods. Follow the wiring table below to connect your TTL adapter to the AP’s serial header.
TTL Adapter | → | AP Header |
Tx | → | Rx |
Rx | → | Tx |
GND | → | GND |
VCC 3.3 V | → | VCC 3.3 V |
⚠ Cross Tx and Rx. Connect the adapter’s Tx to the AP’s Rx and vice versa — this is a common wiring mistake. Use 3.3 V logic levels only; 5 V may damage the AP’s serial header.
🔌
USB Serial (exposed)
Some APs ship with a USB serial port accessible from the outside — plug in directly, no disassembly required.
🔗
RJ45 Serial (exposed)
Others use an RJ45 connector on the housing as a console port. Use a rollover cable with an RJ45-to-DB9 adapter.
🔧
Internal header (requires opening)
If no external serial port is present, open the AP enclosure and use DuPont jumper wires on the PCB serial header. Refer to the board silk-screen for Tx/Rx/GND labels.
Already Have These APs? We Have the Firmware.
Beyond Asteraix’s own OpenWiFi AP lineup, we provide ready-to-flash images for the following third-party models.
📶
EAP101
Qualcomm-based
📶
EAP102
Qualcomm-based
📶
EAP105
Qualcomm-based
📶
RAP630C-311G
Enterprise indoor AP
📶
hfcl_ion4xe
MTK-based
+ More on request
Don’t see your model? Visit the full TIP OpenWiFi supported hardware list at tip-1.gitbook.io/openwifi. We will adapt and compile a custom OpenWiFi image for your specific model — contact us with the make and model.
For hardware not on our pre-validated list, Asteraix’s firmware engineering team will assess the chipset platform, source the appropriate OpenWiFi board support package, compile a model-specific image, and deliver it ready for flashing — so your team can skip the toolchain setup entirely.
After flashing, all AP models — regardless of original manufacturer — appear identically within the ACC controller dashboard.
From Flashed AP to Fully Managed — in Minutes
After firmware installation, AP onboarding to the Asteria controller is nearly fully automated.
What You Get After Flashing
Platform in Action
Once your AP runs OpenWiFi firmware, they are ready for the full Asteria Network Controller feature set: centralized SSID management, real-time monitoring, health scoring, remote firmware updates, multi-tenant support, and script-based automation — all from one dashboard for wired and wireless. Available as SaaS at wifi.asternos.com or self-hosted on-premises. Giving you full visibility into every device, client, and link from a single dashboard.
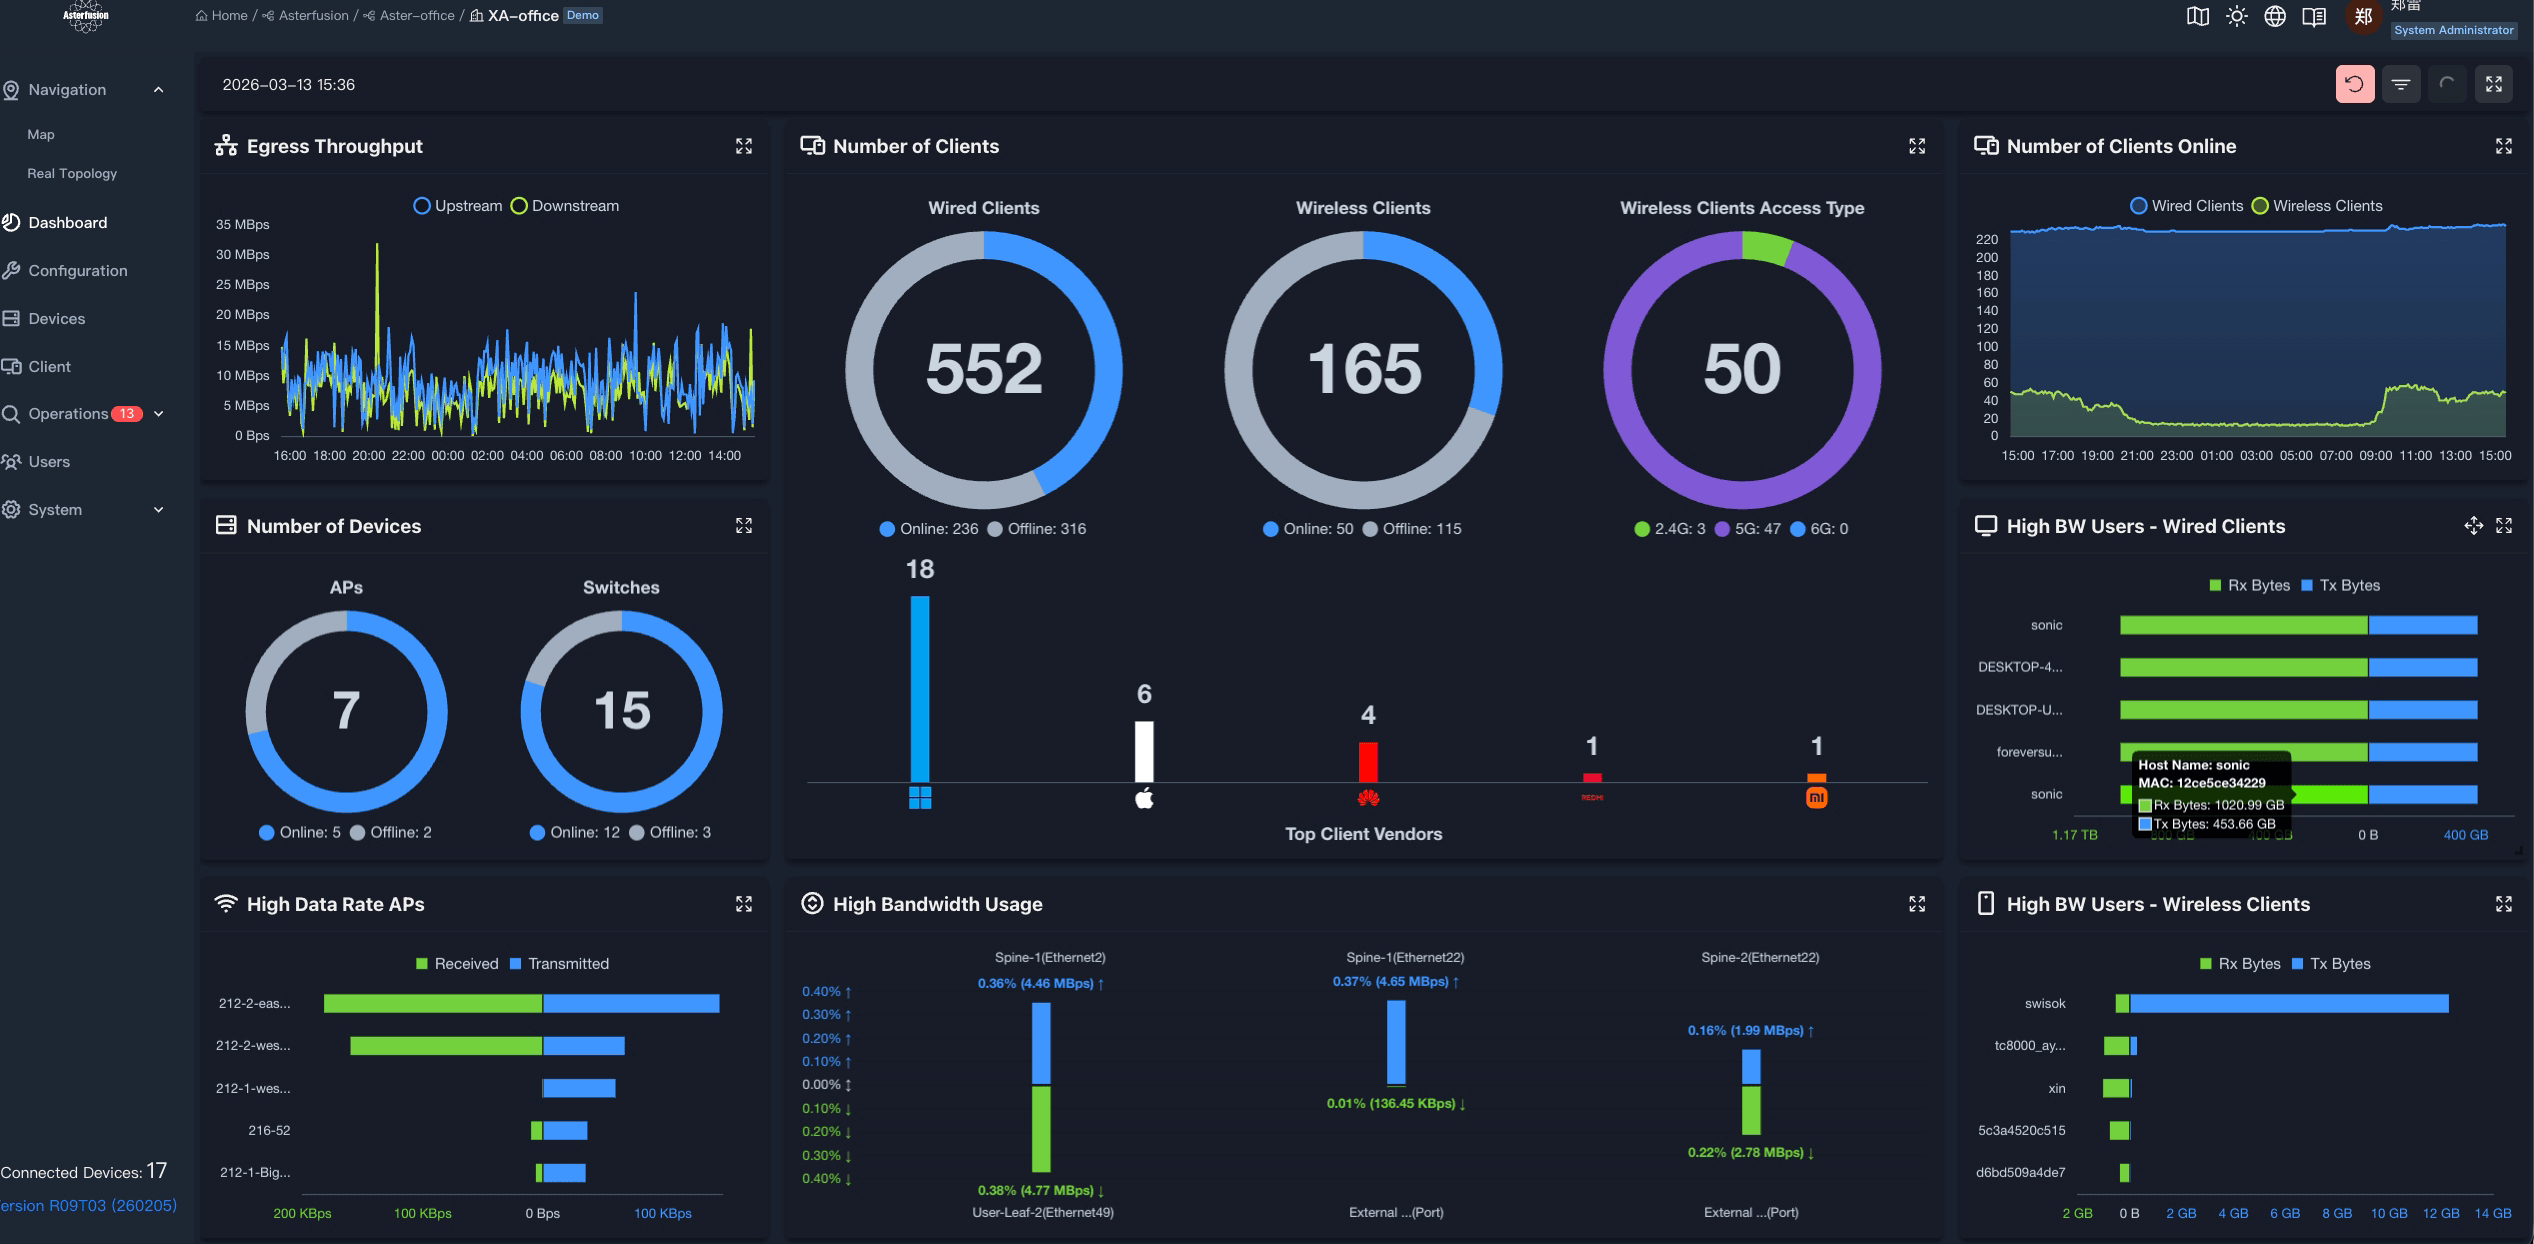
Dashboard
Real-Time Network Overview
Monitor egress throughput, total wired (552) and wireless (165) clients, APs and switches status, and top bandwidth users — all from one live dashboard screen.
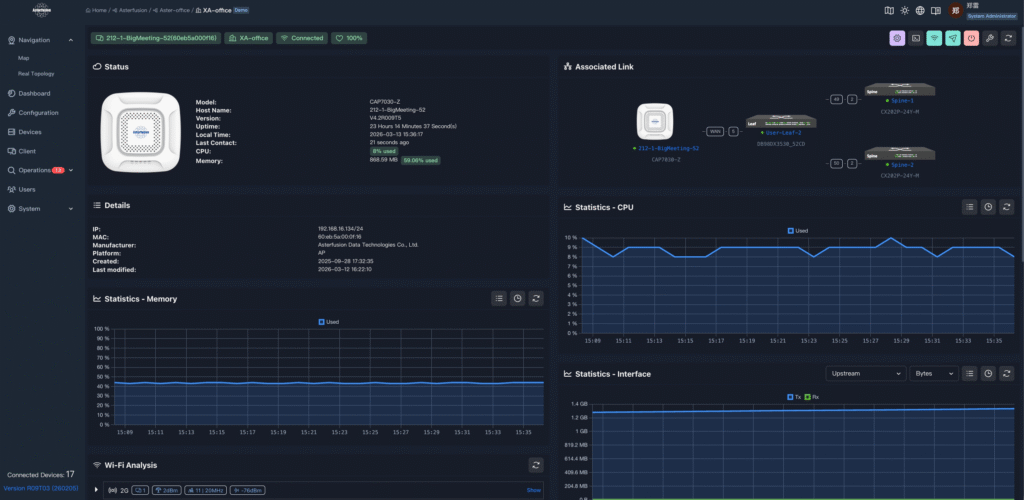
AP Management
Per-AP Health & Statistics
Drill into any access point for CPU %, memory usage, interface throughput, uptime, and the physical association topology — all updated in real time.
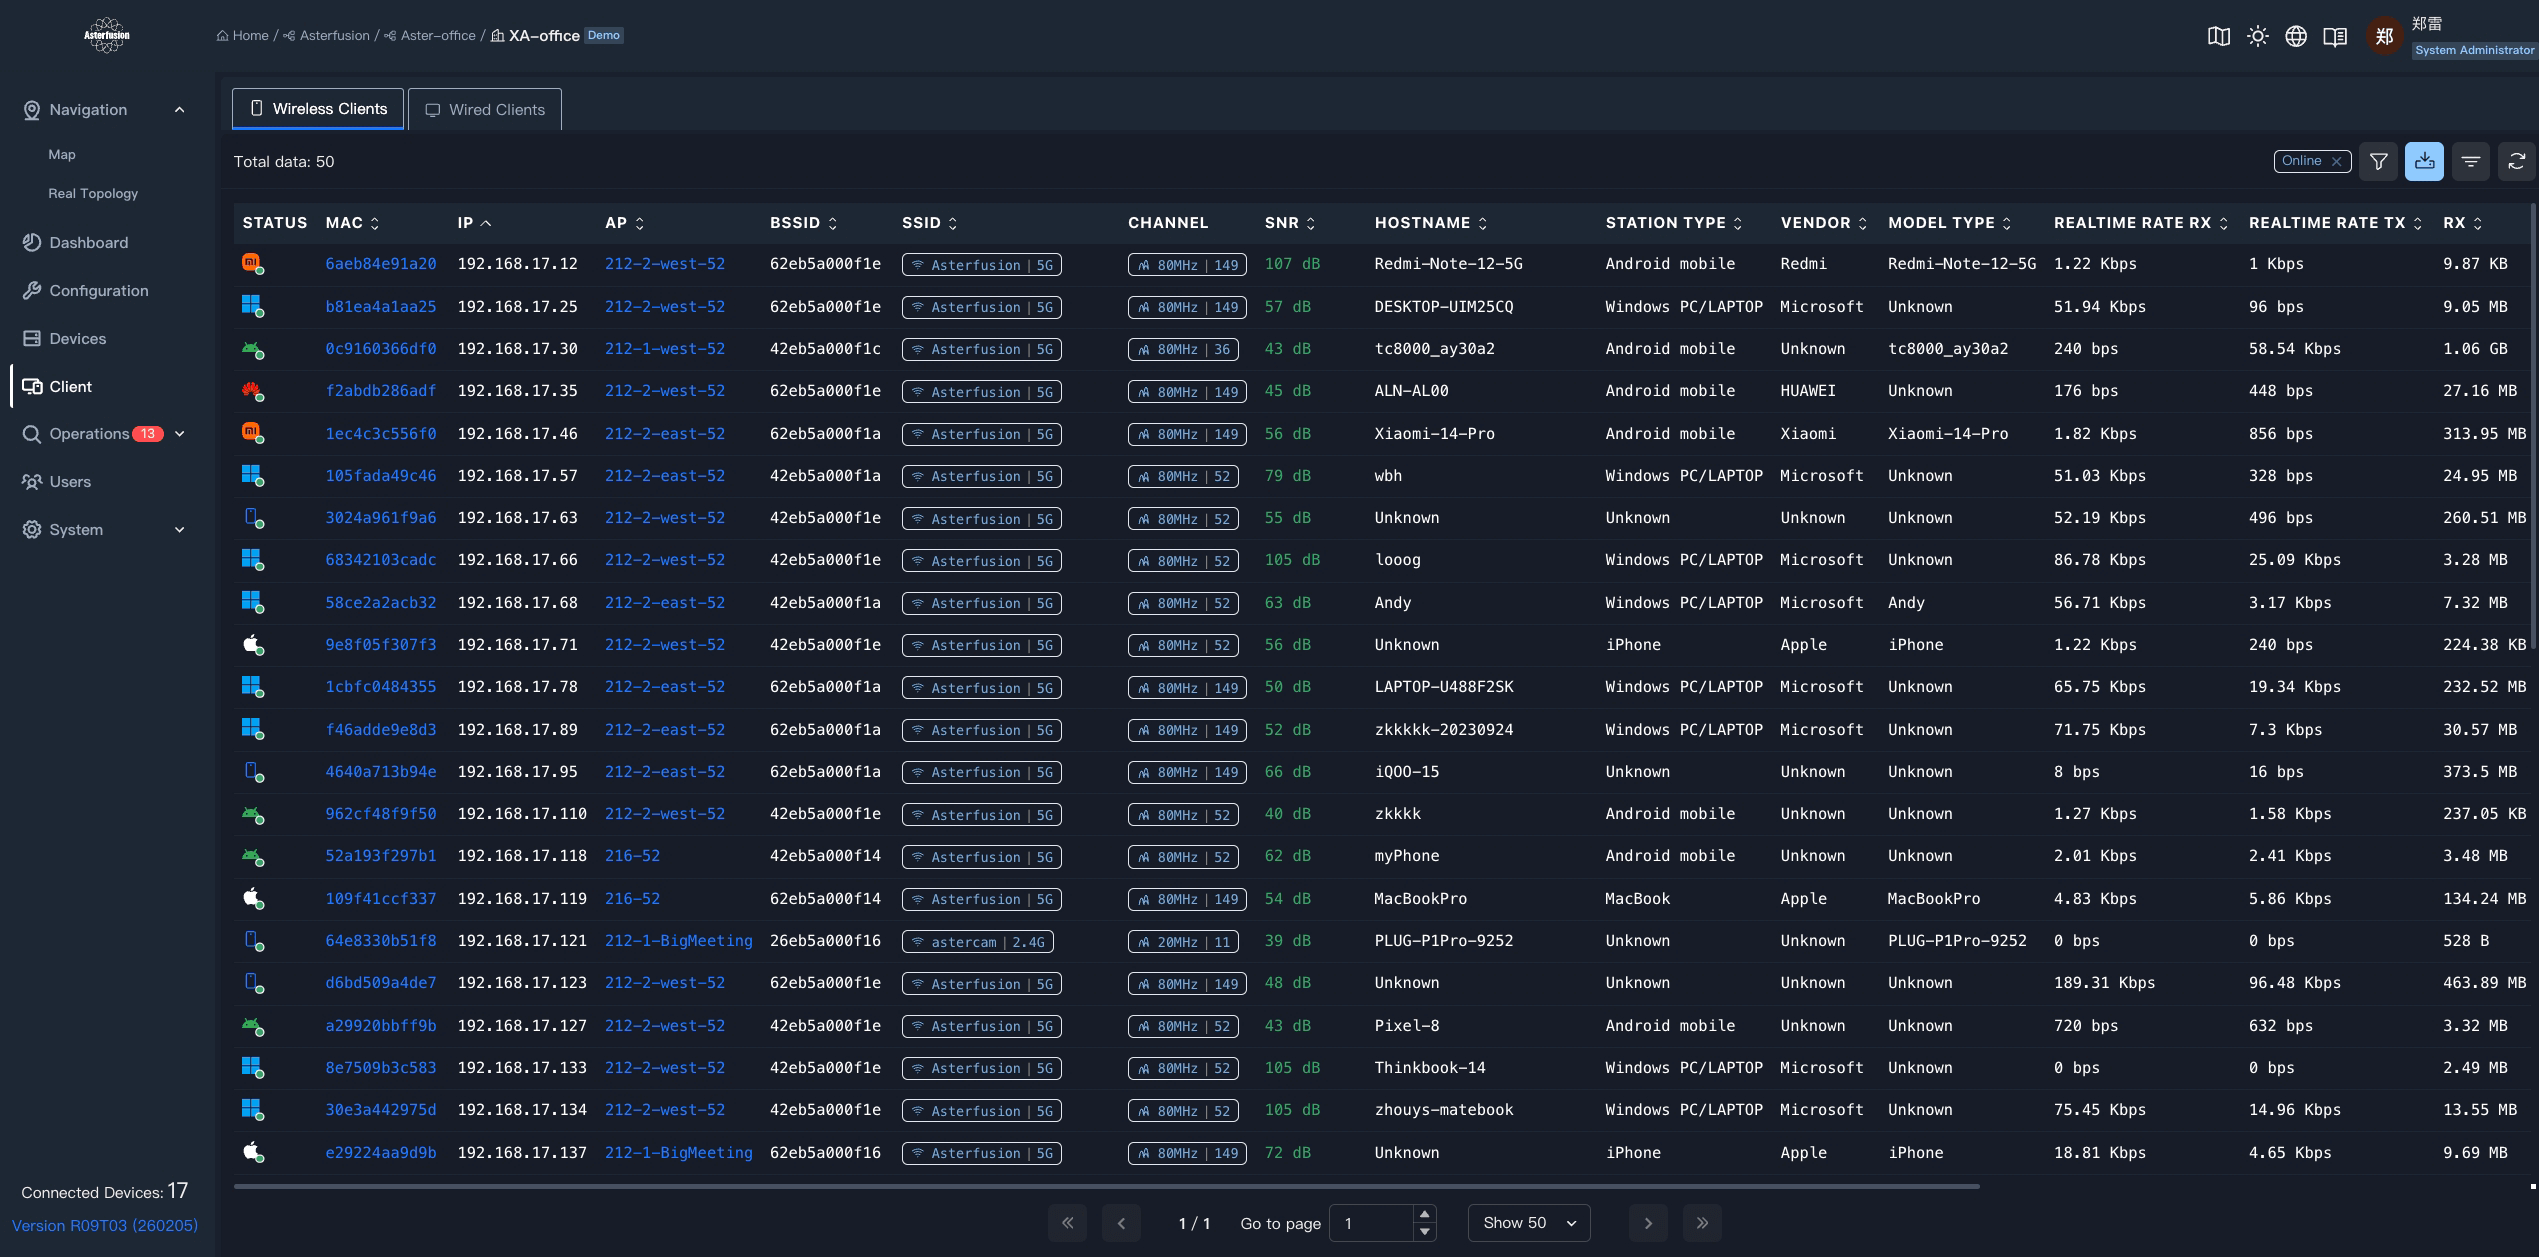
Client Visibility
Complete Wireless Client Table
See every wireless client: MAC, IP, associated AP, SSID, channel, SNR, station type, vendor, and real-time Rx/Tx rates — filterable and sortable.
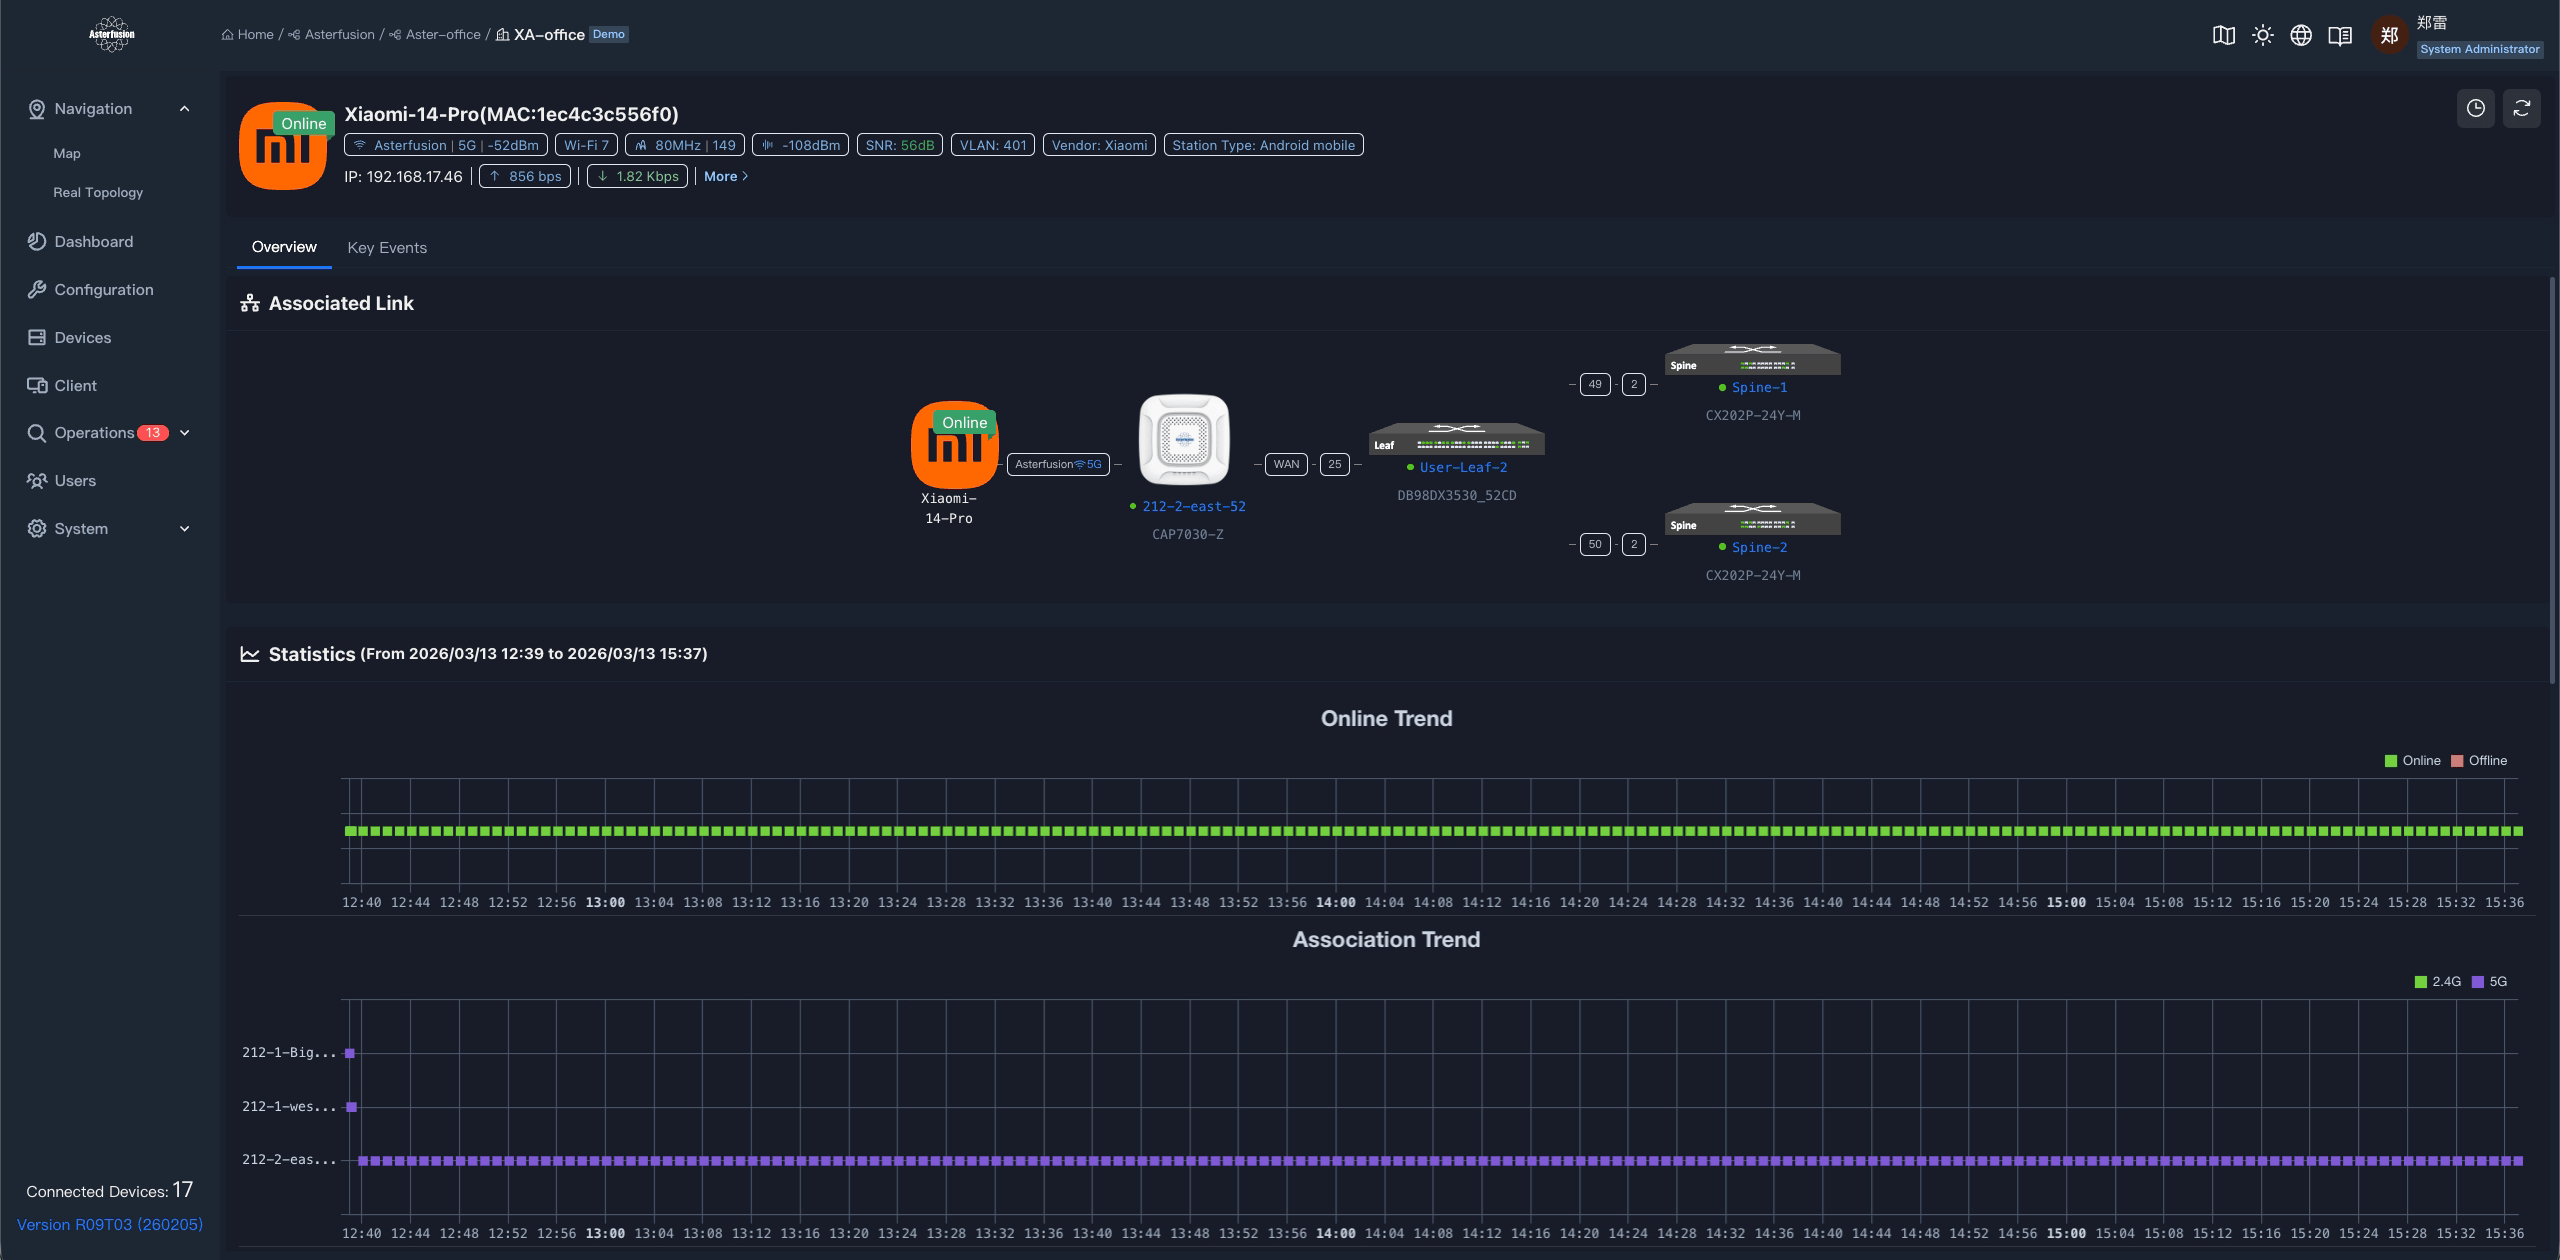
Client Analytics
Per-Client Online & Association Trend
Track any client’s online/offline history and which APs it has associated to over time — useful for diagnosing roaming gaps or coverage dead zones.
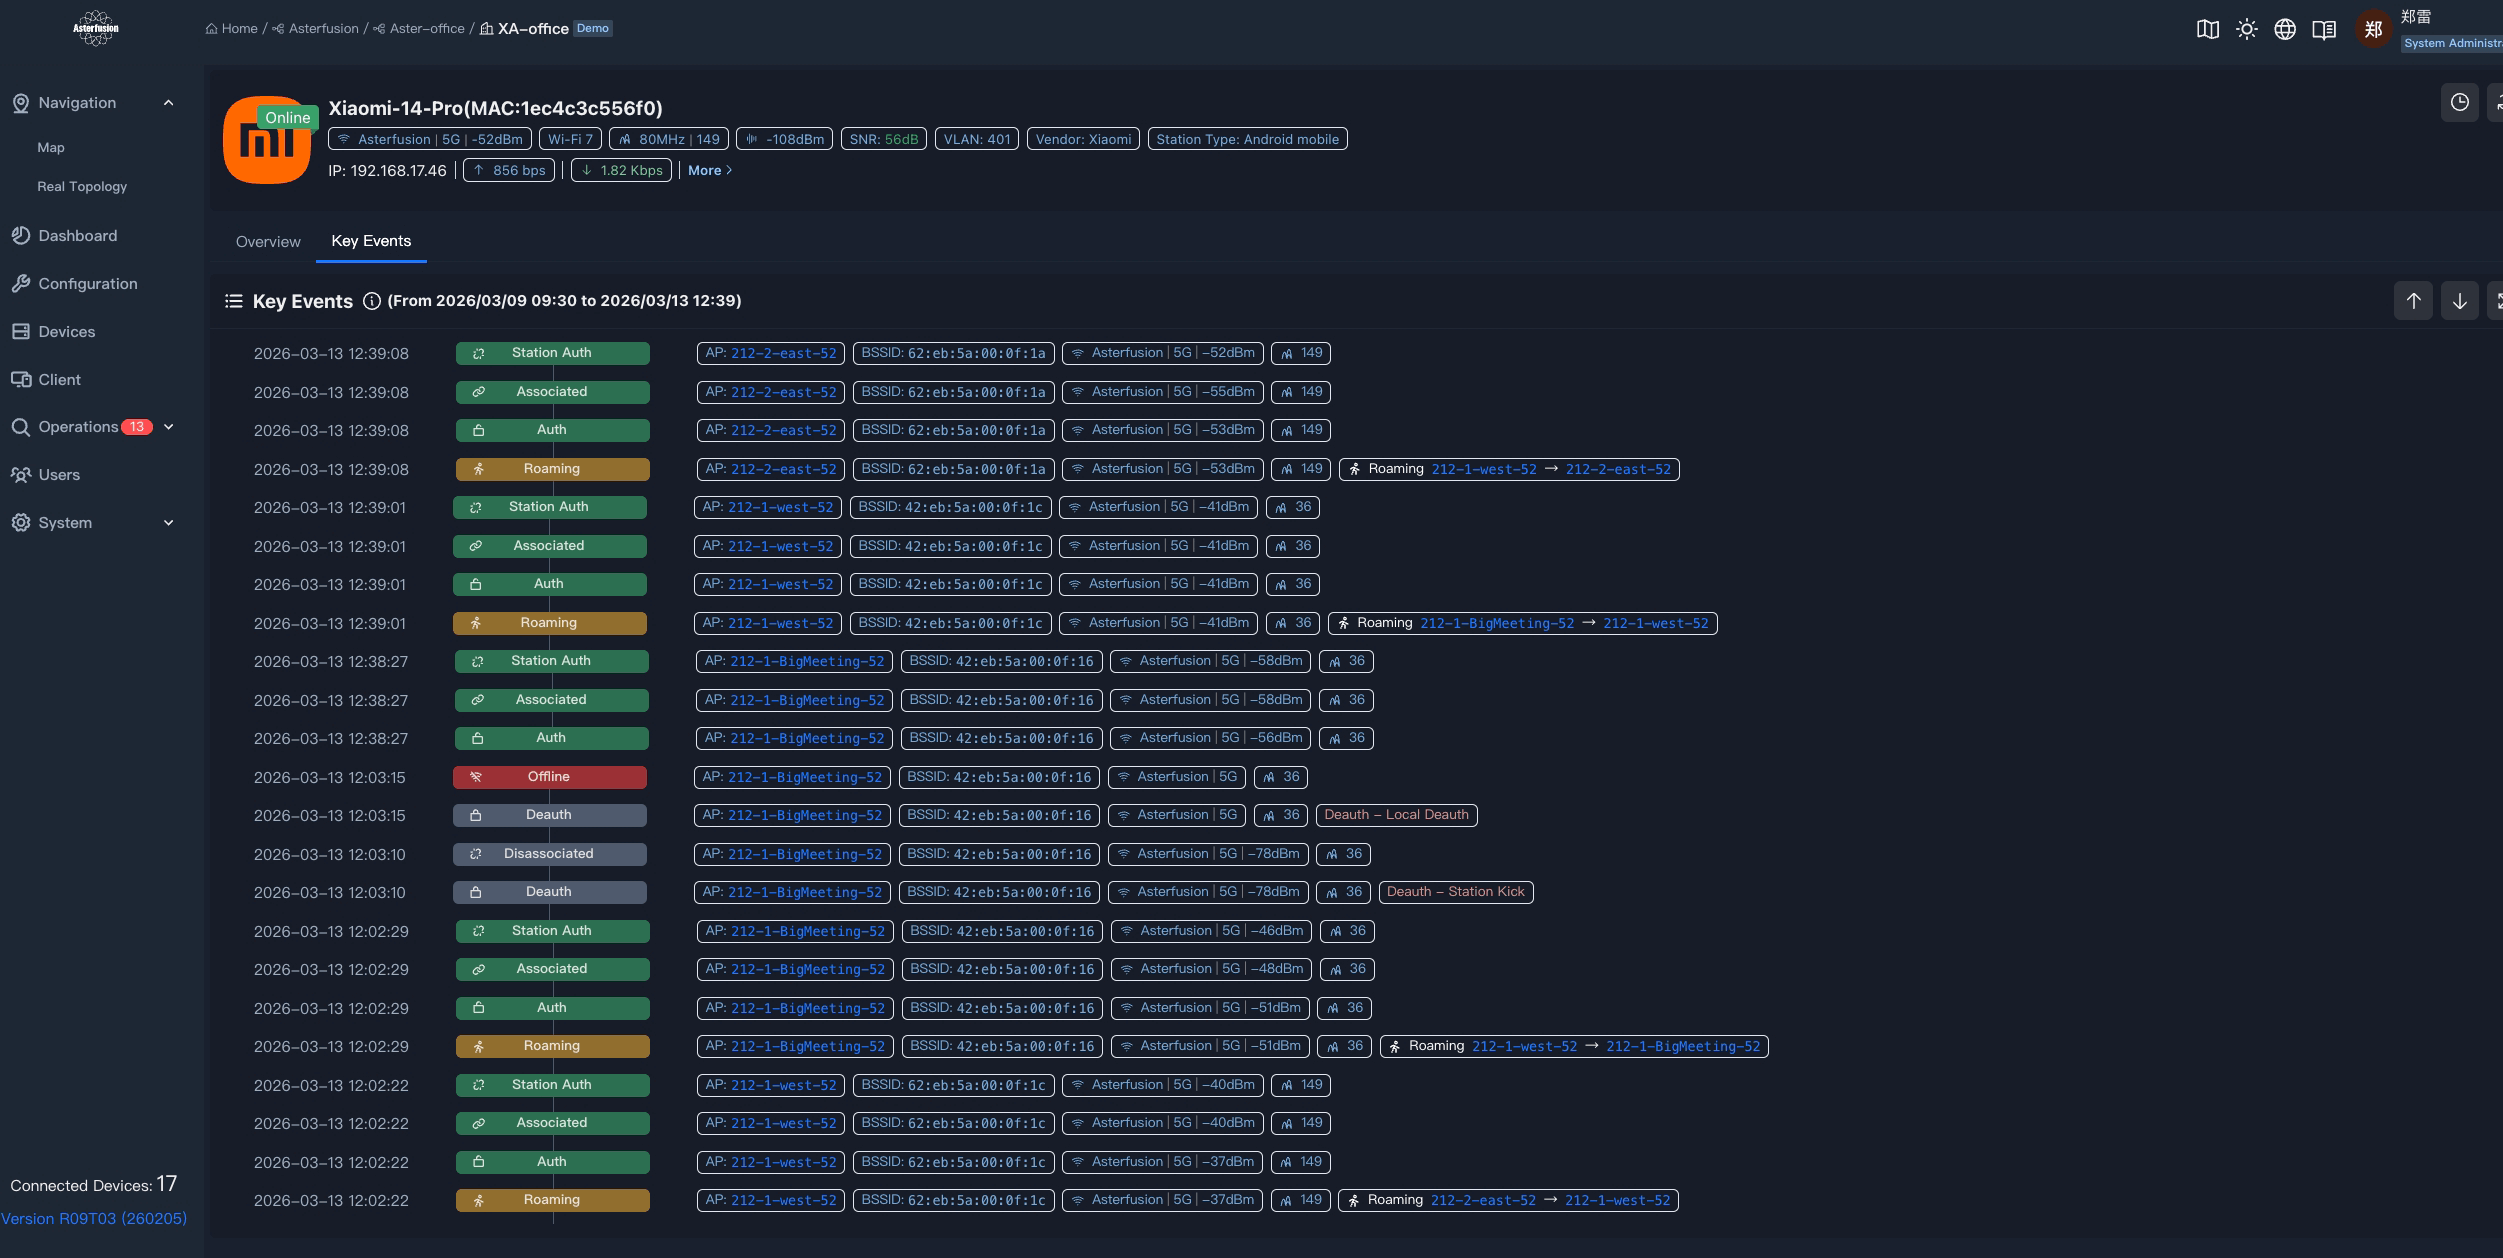
Roaming & Events
Full Client Event Timeline
Every authentication, association, deauth, and roaming handoff is logged with timestamps, BSSID, signal level, and channel — making RF troubleshooting precise and fast.

Reviews
There are no reviews yet.