AsterNOS-VPP VMware ESXi Quick Start Guide
Transform your x86 server into a high-performance virtual router with line-rate L2/L3 Forwarding and NAT services. Unlike standard virtual machine deployments, this guide leverages PCI Passthrough technology to bypass the virtualization layer, unlocking the full performance potential of the hardware. This guide provides a step-by-step tutorial for deploying the AsterNOS-VPP virtual gateway on a VMware ESXi environment.
What You’ll Build
By the end of this guide, you’ll have:
✅ AsterNOS-VPP VM running on VMware ESXi with PCI passthrough
✅ Wire-speed VLAN switching (950+ Mbps)
✅ Inter-VLAN routing at line rate
✅ NAT gateway with internet access for internal networks
Prerequisites
Knowledge Requirements
Familiarity with VMware ESXi web client
Basic understanding of IP addressing, VLANs, and routing
Hardware Requirements
x86 server with Intel VT-d enabled in BIOS
Supported network card (e.g., Intel i350)
Minimum: 4 CPU cores, 8GB RAM
Software & Tools
VMware ESXi 7.0 or later
AsterNOS-VPP image (Download)
qemu-img (for image conversion)
iperf3 (for performance testing)
Network Topology
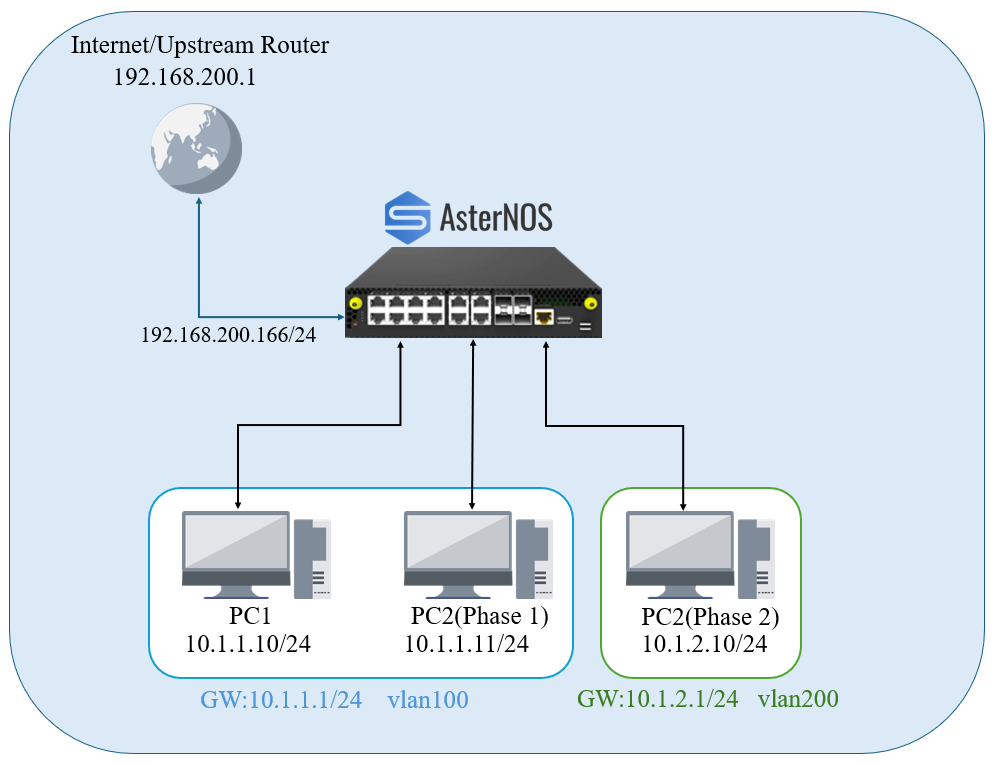
Interface Planning
| Device / Interface | Physical Mapping | IP Address / Subnet | Notes / Connection Point |
|---|---|---|---|
| Ethernet1 | Host Machine | / | Management InterfaceConnected to ESXi vSwitch0 |
| Ethernet2 | vmnic1(Passthrough) | 192.168.200.166/24 | WAN InterfaceConnects to Upstream Gateway |
| Ethernet3 | vmnic2(Passthrough) | N/A (L2 Port) | Member of VLAN 100Connects to PC 1 |
| Ethernet4 | vmnic3(Passthrough) | N/A (L2 Port) | Member of VLAN 200Connects to PC 2 |
| Interface Vlan 100 | (Logical) | 10.1.1.1/24 | Gateway for LAN1 |
| Interface Vlan 200 | (Logical) | 10.1.2.1/24 | Gateway for LAN2 |
Step 1: Prepare the Image
Convert QCOW2 to VMDK
Software Download: Click To Download SONiC-VPP.img
Conversion Tool: qemu-img (Required for converting qcow2 to vmdk on a local PC before uploading).
Testing Tools: iperf3 (Must be installed on both Client PCs for throughput testing).
AsterNOS ships in QCOW2 format. VMware ESXi requires VMDK.
On your local machine (Windows/Linux/Mac), convert the image:
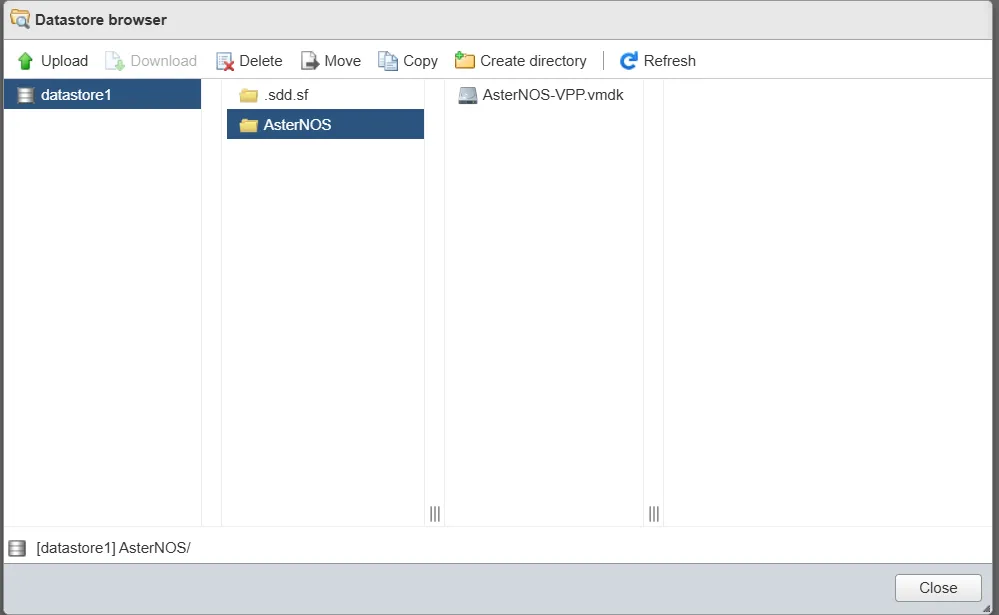
qemu-img convert -f qcow2 -O vmdk sonic-vpp.img asternos-vpp.vmdkUpload to ESXi
- Log in to ESXi web client
- Navigate to Storage → Datastore browser
- Create a new folder:
asternos - Upload
asternos-vpp.vmdkto this folder
Step 2: Enable PCI Passthrough
PCI passthrough allows the VM to directly access physical NICs, bypassing the virtual switch for maximum performance.
Configure Passthrough Devices
- Navigate to Manage → Hardware → PCI Devices
- Locate your network adapter
- Select the ports for data traffic (do not select ESXi management port)
- Click Toggle passthrough
- Verify status changes to Active
- Reboot ESXi host to apply changes
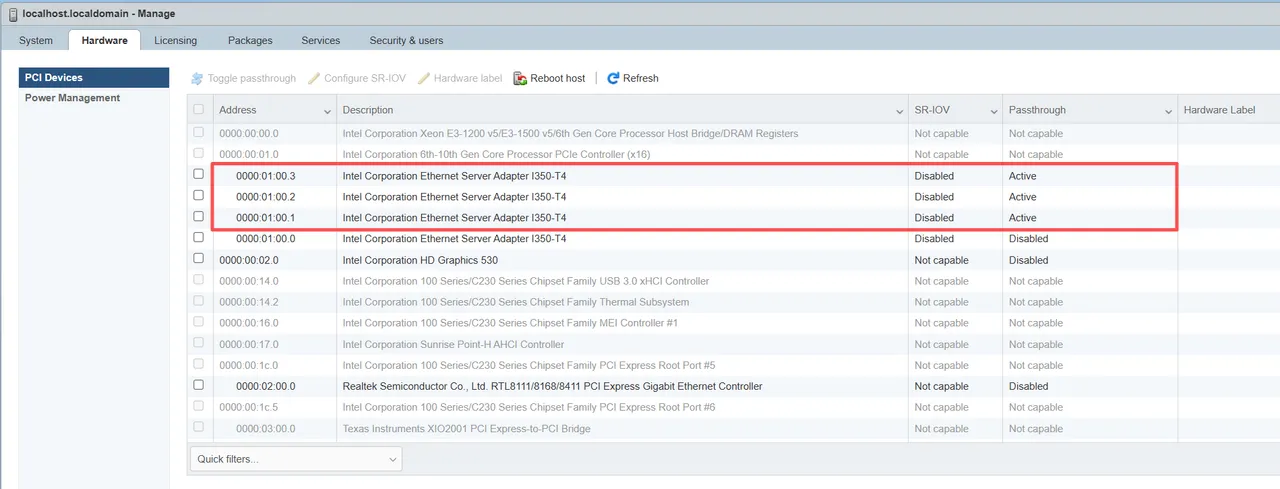
⚠️ Critical: Do NOT select the port used for the ESXi Management Network.
Step 3: Create the Virtual Machine
VM Creation Wizard
- Click Create/Register VM
- Select Create a new virtual machine
VM Configuration
General Settings:
- Name: AsterNOS-VPP
- Guest OS Family: Linux
- Guest OS Version: Debian GNU/Linux 11 (64-bit)
Hardware:
| Component | Setting | Notes |
|---|---|---|
| CPU | 4 vCPUs | Minimum requirement |
| Memory | 8 GB | Must reserve all memory |
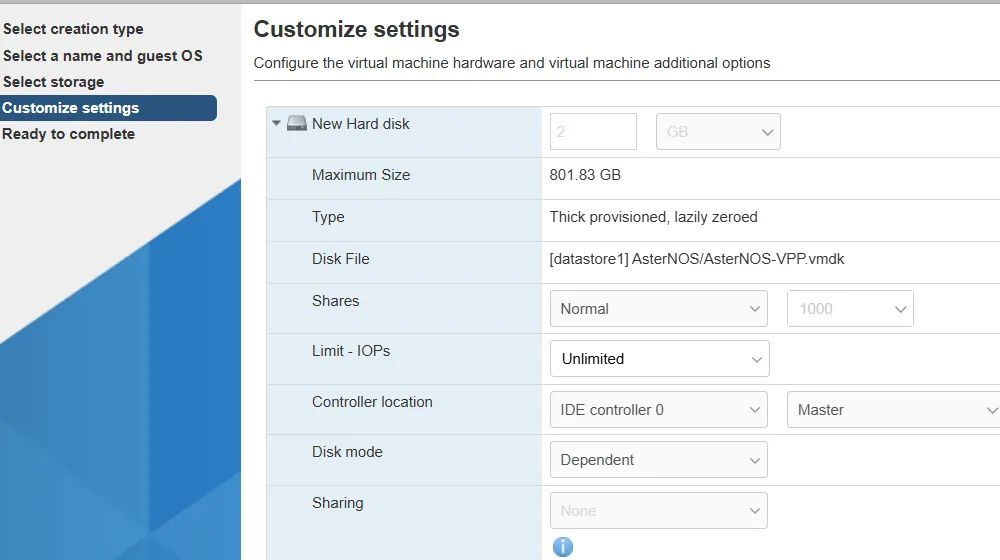
| Hard Disk | Delete default → Add existing → Browse to asternos-vpp.vmdk | Use IDE controller |
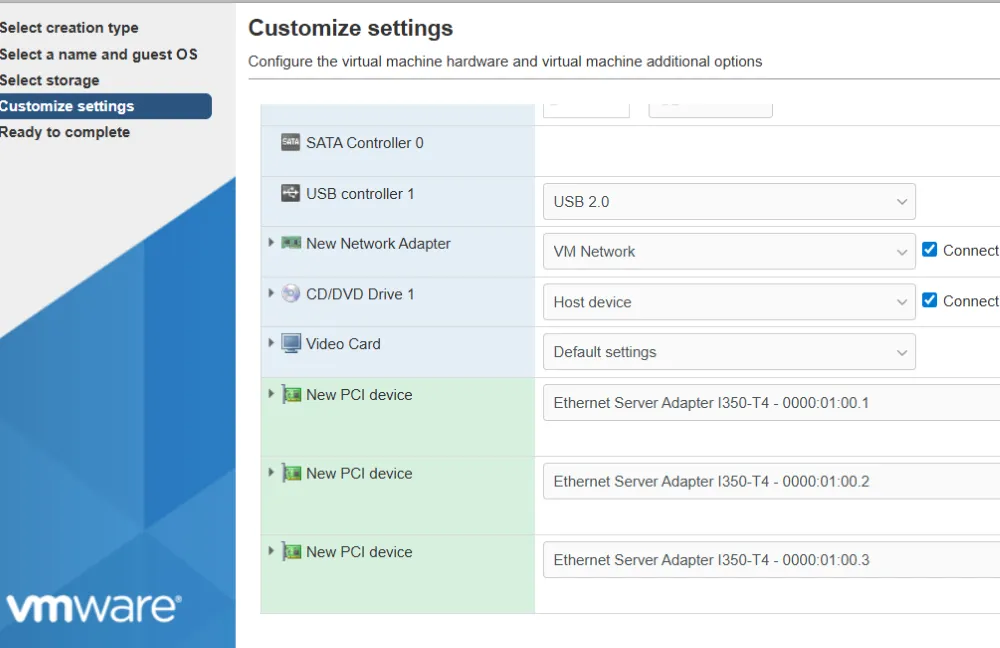
| Network Adapter 1 | VM Network (vSwitch0) | Maps to ethernet1 (management) |
| PCI Device 1 | Add passthrough port #1 | Maps to ethernet2 (WAN) |
| PCI Device 2 | Add passthrough port #2 | Maps to ethernet3 (LAN) |
| PCI Device 3 | Add passthrough port #3 | Maps to ethernet4 (LAN) |
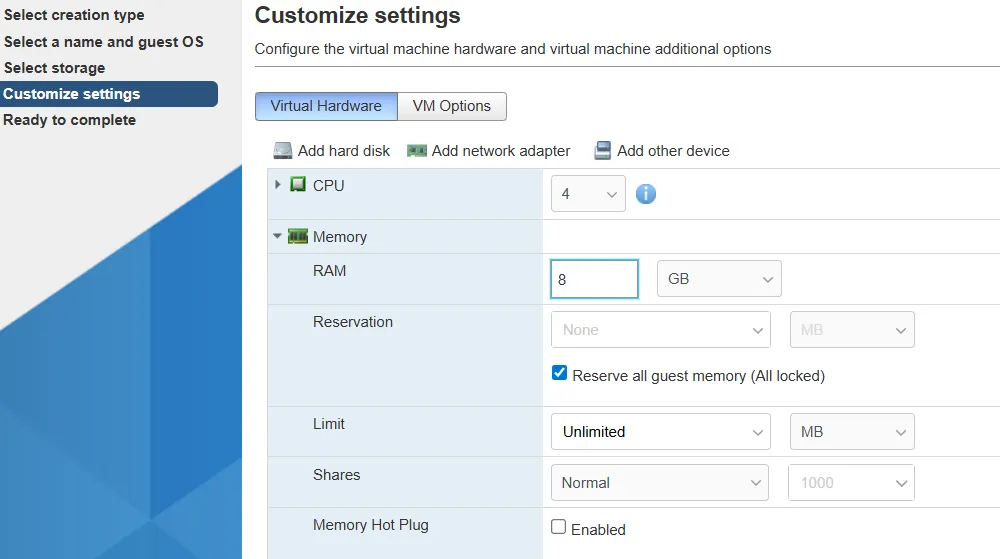
Critical Memory Setting
Expand Memory settings and check:
- ☑️ “Reserve all guest memory (All locked)”
⚠️ Without this setting, PCI passthrough devices will fail to start.
Finish & Power On
- Review settings
- Click Finish
- Power on the VM
- Open console
Step 4: Initial Network Configuration
Access the VM
Console Login:
- Username:
admin - Password:
asteros
Enter CLI:
admin@sonic:~$ sonic-cli
sonic#
Enter Configuration Mode
sonic# configure terminal
sonic(config)#
Step 5: Configure WAN Interface
Set up internet connectivity via ethernet2.
# Configure WAN interface
sonic(config)# interface ethernet 2
sonic(config-if-ethernet2)# ip address 192.168.200.166/24
sonic(config-if-ethernet2)# nat zone 1
sonic(config-if-ethernet2)# no shutdown
sonic(config-if-ethernet2)# exit

# Configure default route
sonic(config)# ip route 0.0.0.0/0 192.168.200.1
Verify connectivity:
sonic# ping 8.8.8.8Step 6: Configure VLANs & Gateways
# Create VLANs
sonic(config)# vlan 100
sonic(config-vlan-100)# exit

sonic(config)# vlan 200
sonic(config-vlan-200)# exit

# Configure VLAN 100 gateway
sonic(config)# interface vlan 100
sonic(config-vlanif-vlan100)# ip address 10.1.1.1/24
sonic(config-vlanif-vlan100)# exit

# Configure VLAN 200 gateway
sonic(config)# interface vlan 200
sonic(config-vlanif-vlan200)# ip address 10.1.2.1/24
sonic(config-vlanif-vlan200)# exit
Step 7: Configure NAT
Enable Source NAT to provide internet access for internal clients.
# Enable NAT
sonic(config)# nat enable

# Create NAT pool
sonic(config)# nat pool lan-pool 192.168.200.166

# Bind NAT
sonic(config)# nat binding lan-binding lan-pool
Step 8: Configure LAN Interfaces
Initial Setup (Both ports in VLAN 100 for Layer 2 test)
# Configure ethernet3
sonic(config)# interface ethernet 3
sonic(config-if-ethernet3)# no router interface
sonic(config-if-ethernet3)# switchport access vlan 100
sonic(config-if-ethernet3)# no shutdown
sonic(config-if-ethernet3)# exit

# Configure ethernet4 (initially in VLAN 100)
sonic(config)# interface ethernet 4
sonic(config-if-ethernet4)# no router interface
sonic(config-if-ethernet4)# switchport access vlan 100
sonic(config-if-ethernet4)# no shutdown
sonic(config-if-ethernet4)# exit

# Save configuration
sonic(config)# exit
sonic# write
Step 9: Performance Verification
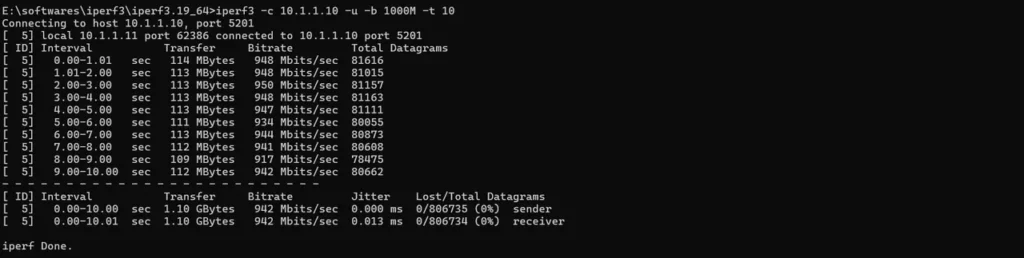
Phase 1: Layer 2 Switching Test
Test wire-speed VLAN switching between PC1 and PC2.
PC Setup:
- PC1: IP:
10.1.1.10, Mask:255.255.255.0, Gateway:10.1.1.1 - PC2: IP:
10.1.1.11, Mask:255.255.255.0, Gateway:10.1.1.1
Run iperf3:
# On PC1 (server)
iperf3 -s

# On PC2 (client)
iperf3 -c 10.1.1.10 -u -b 1000M -t 10
✅ Expected Result: ~950 Mbps throughput (line-rate 1GbE)
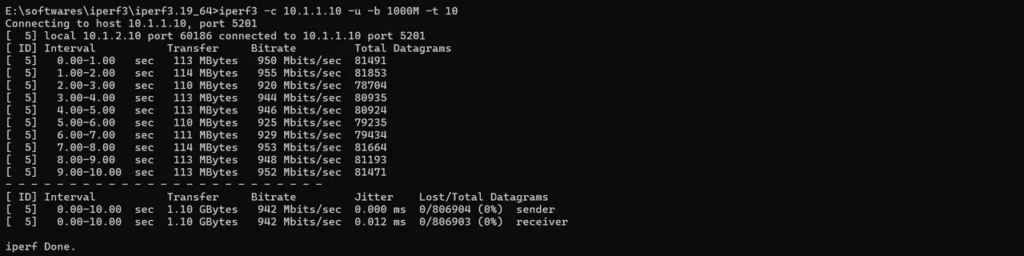
Phase 2: Layer 3 Routing & NAT Test
Reconfigure for inter-VLAN routing.
# Move ethernet4 to VLAN 200
sonic# configure terminal
sonic(config)# interface ethernet 4
sonic(config-if-ethernet4)# no switchport access vlan 100
sonic(config-if-ethernet4)# switchport access vlan 200
sonic(config-if-ethernet4)# exit
sonic(config)# exit
sonic# write
Update PC2 network settings:
- IP:
10.1.2.10 - Mask:
255.255.255.0 - Gateway:
10.1.2.1
Test inter-VLAN routing:
# On PC1 (server)
iperf3 -s

# On PC2 (client)
iperf3 -c 10.1.1.10 -u -b 1000M -t 10
✅ Expected Result: ~950 Mbps throughput
Test internet access:
# On PC1
ping 8.8.8.8
✅ Expected Result: Successful replies

Verify NAT translations:
sonic# show nat translations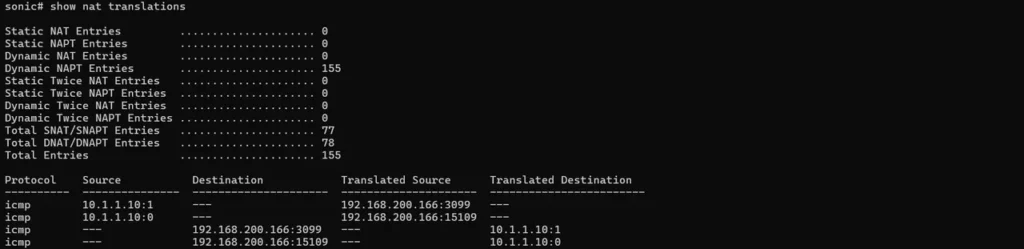
Troubleshooting
VM Won’t Boot
- Check that all guest memory is reserved (All locked)
- Verify PCI devices are in “Active” status
- Ensure ESXi host was rebooted after enabling passthrough
No Network Connectivity
- Verify interface status:
show interfaces status - Check IP configuration:
show ip interface - Confirm default route:
show ip route
Low Performance
- Verify PCI passthrough is active (not using virtual NIC)
- Check CPU allocation (minimum 4 cores)
- Ensure memory reservation is enabled
NAT Not Working
- Verify NAT is enabled:
show nat config - Check NAT bindings:
show nat bindings - Confirm zone configuration on WAN interface
Summary
✅ What You Accomplished:
- Deployed AsterNOS-VPP on VMware ESXi with hardware acceleration
- Achieved line-rate Layer 2/3 forwarding (950+ Mbps)
- Configured NAT gateway for internet access
- Validated performance with real-world testing
Performance achieved on standard x86 hardware demonstrates that AsterNOS-VPP delivers enterprise-grade routing without specialized hardware.
Support & Resources
Need help? Contact our support team or join our community forum.