AsterNOS-VPP Linux KVM Quick Start Guide
Transform your standard x86 server into a high-performance virtual router with enterprise-grade capabilities. Unlike traditional virtual machine deployments that suffer from performance bottlenecks, this guide leverages PCI Passthrough technology to bypass the virtualization layer entirely, delivering wire-speed Layer 2/3 forwarding and NAT services on commodity hardware.
What You’ll Build
By the end of this guide, you’ll have:
✅ AsterNOS-VPP VM running on Ubuntu/KVM with hardware acceleration
✅ Wire-speed VLAN switching (950+ Mbps on 1GbE)
✅ Inter-VLAN routing at line rate
✅ NAT gateway with internet access for internal networks
✅ Production-ready virtual router on standard x86 hardware
Prerequisites
Knowledge Requirements
Basic Linux command-line proficiency (editing files, system administration)
Understanding of networking fundamentals (IP addressing, VLANs, routing)
Familiarity with virtual machines and QEMU/KVM concepts
Hardware Requirements
x86 server with Intel VT-d support enabled in BIOS
Supported network adapter (e.g., Intel i350 quad-port)
CPU with SSE4 instruction set support
Minimum: 4 CPU cores, 8GB RAM, 64GB disk
Software & Tools
Ubuntu Linux 24.04 (host OS)
QEMU/KVM 8.2.2
libvirt 10.0.0
AsterNOS-VPP virtual disk image
Testing Tools
iperf3 (for performance validation)
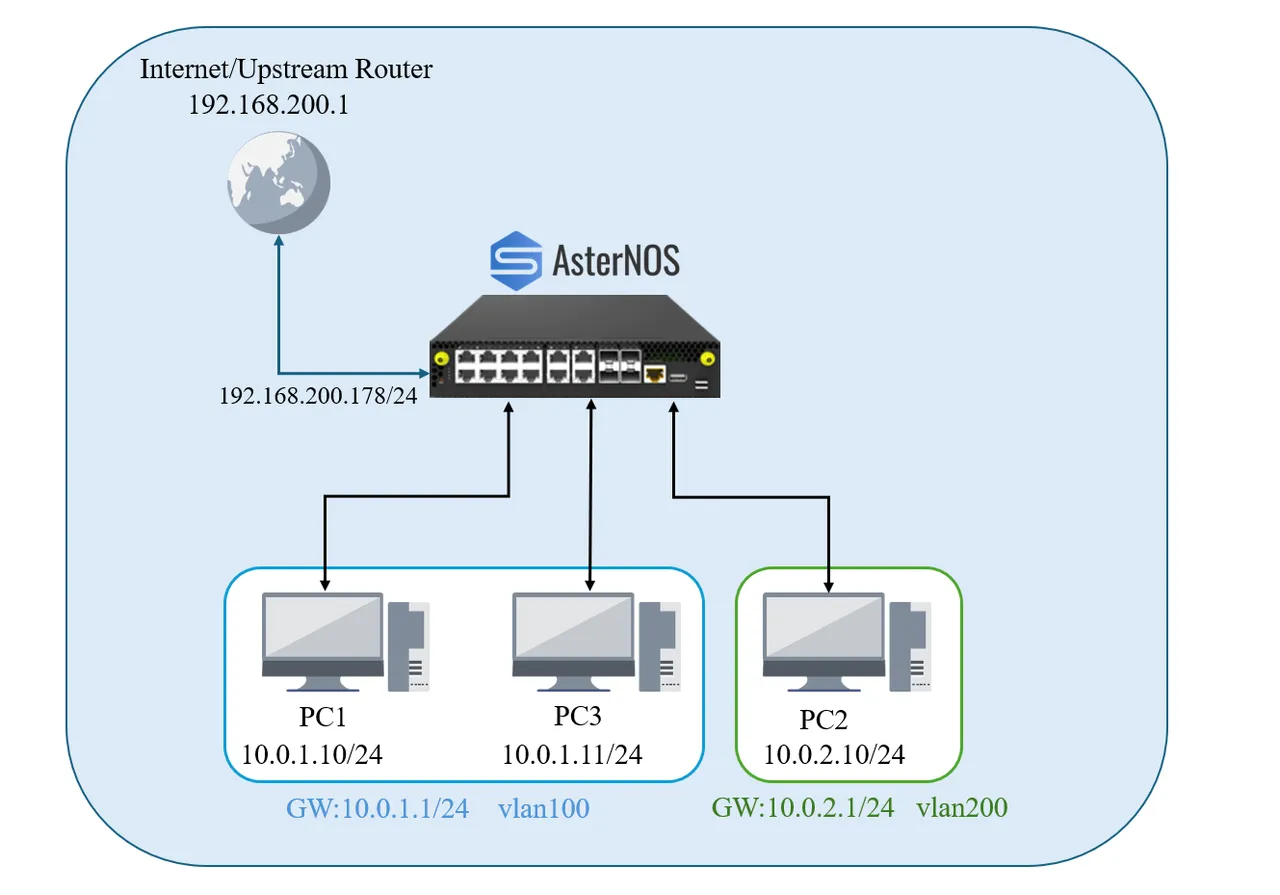
Network Topology
Interface Planning
| Physical Port | PCI Address | AsterNOS Interface | IP Address / Subnet | Purpose |
|---|---|---|---|---|
| ens3f0 | 02:00.0 | Ethernet1 | 192.168.200.178/24 | WAN Interface – Upstream gateway |
| ens3f1 | 02:00.1 | Ethernet2 | N/A (L2 Port) | LAN Port – Member of VLAN 100 (PC1) |
| ens3f2 | 02:00.2 | Ethernet3 | N/A (L2 Port) | LAN Port – Member of VLAN 200 (PC2) |
| ens3f3 | 02:00.3 | Ethernet4 | N/A (L2 Port) | LAN Port – Member of VLAN 100 (PC3) |
| Interface Vlan 100 | (Logical) | Vlan100 | 10.0.1.1/24 | Gateway for LAN1 (PC1 & PC3) |
| Interface Vlan 200 | (Logical) | Vlan200 | 10.0.2.1/24 | Gateway for LAN2 (PC2) |
Test Network Configuration
| Device | IP Address | Subnet Mask | Gateway | VLAN |
|---|---|---|---|---|
| PC1 | 10.0.1.10 | 255.255.255.0 | 10.0.1.1 | 100 |
| PC2 | 10.0.2.10 | 255.255.255.0 | 10.0.2.1 | 200 |
| PC3 | 10.0.1.11 | 255.255.255.0 | 10.0.1.1 | 100 |
Step 1: Enable IOMMU & PCI Passthrough
PCI passthrough allows the VM to directly control physical NICs, bypassing the virtual switch for maximum performance.
Enable VT-d in BIOS
- Reboot the Ubuntu host and enter BIOS/UEFI setup
- Navigate to CPU or Virtualization settings
- Enable both:
- Intel Virtualization Technology (VT-x)
- Intel VT-d (or AMD-Vi for AMD processors)
- Save settings and reboot
Configure GRUB Bootloader
Enable IOMMU support in the Linux kernel:
# Edit GRUB configuration
sudo nano /etc/default/grub

# Find this line:
GRUB_CMDLINE_LINUX_DEFAULT="quiet splash"

# Change it to:
GRUB_CMDLINE_LINUX_DEFAULT="quiet splash intel_iommu=on iommu=pt"

# For AMD processors, use:
GRUB_CMDLINE_LINUX_DEFAULT="quiet splash amd_iommu=on iommu=pt"

# Update GRUB
sudo update-grub
Do not reboot yet – complete the next step first.
Step 2: Configure VFIO Driver
The VFIO driver enables safe, direct device access from the VM.
Identify Network Card PCI IDs
# This command lists all network devices and their IDs
lspci -nn | grep -i ethernet

# Example output:
# 02:00.0 Ethernet controller [0200]: Intel Corporation I350 Gigabit Network Connection [8086:1521]
📝 Note the device ID – in this example: 8086:1521

Bind NICs to VFIO Driver
# Configure VFIO to manage your network card
# Replace 8086:1521 with your actual device ID
echo "options vfio-pci ids=8086:1521" | sudo tee /etc/modprobe.d/vfio.conf

# Prevent Ubuntu from loading the default driver
echo "blacklist igb" | sudo tee /etc/modprobe.d/blacklist-igb.conf

# For other Intel cards, you may need to blacklist different drivers:
# e1000e (for some Intel adapters)
# ixgbe (for Intel 10G adapters)
Load VFIO Modules Early
# Edit initramfs modules
sudo nano /etc/initramfs-tools/modules

# Add these lines at the end:
vfio
vfio_iommu_type1
vfio_pci
vfio_virqfd

# Update initramfs and reboot
sudo update-initramfs -u
sudo reboot
Verify Configuration
After reboot, confirm VFIO is managing the NICs:
lspci -nnk | grep -A3 02:00

# Expected output should show:
# Kernel driver in use: vfio-pci
✅ If you see vfio-pci as the kernel driver, configuration is successful!
Step 3: Launch the Virtual Machine
Download AsterNOS-VPP Image
Software Download: Click To Download AsterNOS-VPP.img
# Create directory for VM images
sudo mkdir -p /var/lib/libvirt/images

# Move the downloaded image
sudo mv ~/Downloads/asternos-vpp.img /var/lib/libvirt/images/
Method A: Quick Launch with QEMU (Testing)
For quick testing and validation:
sudo qemu-system-x86_64 \
  -enable-kvm \
  -m 8192 \
  -smp 4 \
  -cpu host \
  -drive file=/var/lib/libvirt/images/asternos-vpp.img,if=virtio,format=qcow2 \
  -device vfio-pci,host=02:00.0,id=wan-nic \
  -device vfio-pci,host=02:00.1,id=lan-nic1 \
  -device vfio-pci,host=02:00.2,id=lan-nic2 \
  -device vfio-pci,host=02:00.3,id=lan-nic3 \
  -nographic \
  -serial mon:stdio
Interface Mapping for This Example:
| PCI Device | Host Address | AsterNOS Interface | Planned Use |
|---|---|---|---|
| host=02:00.0 | ens3f0 | Ethernet1 | WAN |
| host=02:00.1 | ens3f1 | Ethernet2 | LAN (PC1) |
| host=02:00.2 | ens3f2 | Ethernet3 | LAN (PC2) |
| host=02:00.3 | ens3f3 | Ethernet4 | LAN (PC3) |
⚠️ Critical: The order of –device parameters determines interface names in AsterNOS. This order may not match the physical port layout on your server.
💡 Recommendation: Connect only the WAN port initially, boot the VM, and use show interface status to identify which AsterNOS interface corresponds to each physical port.

Method B: Persistent Launch with libvirt (Production)
For production deployment with auto-start and easier management:
sudo virt-install \
  --name asternos \
  --virt-type kvm \
  --memory 8192 \
  --vcpus 4 \
  --cpu host-passthrough \
  --disk path=/var/lib/libvirt/images/asternos-vpp.img,bus=virtio \
  --import \
  --os-variant debian11 \
  --network none \
  --host-device 02:00.0 \
  --host-device 02:00.1 \
  --host-device 02:00.2 \
  --host-device 02:00.3 \
  --nographics
The VM will start automatically and display the console in your terminal.
Enable Auto-Start
# Configure VM to start automatically on host boot
sudo virsh autostart asternos
Access VM Console
# If using libvirt, connect to console anytime with:
sudo virsh console asternos

# To disconnect: Press Ctrl+] (or Ctrl+5 depending on your keyboard)
Step 4: Initial Network Configuration
Access the VM
Console Login:
- Username:
admin - Password:
asteros
Enter CLI:
admin@sonic:~$ sonic-cli
sonic#
Enter Configuration Mode
sonic# configure terminal
sonic(config)#
Step 5: Configure WAN Interface
Set up internet connectivity via Ethernet1.
# Configure WAN interface
sonic(config)# interface ethernet 1
sonic(config-if-ethernet1)# ip address 192.168.200.178/24
sonic(config-if-ethernet1)# nat zone 1
sonic(config-if-ethernet1)# no shutdown
sonic(config-if-ethernet1)# exit

# Configure default route to upstream gateway
sonic(config)# ip route 0.0.0.0/0 192.168.200.1
Verify connectivity:
sonic(config)# exit
sonic# ping 8.8.8.8
✅ Expected Result: Successful ping replies
Step 6: Configure VLANs & Gateways
Create VLANs and their gateway interfaces for internal networks.
sonic# configure terminal

# Create VLAN 100 for LAN1
sonic(config)# vlan 100
sonic(config-vlan-100)# exit

# Create VLAN 200 for LAN2
sonic(config)# vlan 200
sonic(config-vlan-200)# exit

# Configure VLAN 100 gateway
sonic(config)# interface vlan 100
sonic(config-vlanif-vlan100)# ip address 10.0.1.1/24
sonic(config-vlanif-vlan100)# exit

# Configure VLAN 200 gateway
sonic(config)# interface vlan 200
sonic(config-vlanif-vlan200)# ip address 10.0.2.1/24
sonic(config-vlanif-vlan200)# exit
Step 7: Configure NAT
Enable Source NAT to provide internet access for internal clients.
# Enable NAT globally
sonic(config)# nat enable

# Create NAT pool using WAN IP
sonic(config)# nat pool lan-pool 192.168.200.178

# Bind NAT policy
sonic(config)# nat binding lan-binding lan-pool
NAT Configuration Explained:
- NAT Zone 1: Applied to WAN interface (outside)
- NAT Zone 0: Default for LAN interfaces (inside)
- NAT Pool: Defines the public IP for source address translation
- NAT Binding: Links the pool to traffic crossing zones
Step 8: Configure LAN Interfaces
Initially configure all LAN ports in VLAN 100 to test Layer 2 performance:
# Configure Ethernet2 (PC1)
sonic(config)# interface ethernet 2
sonic(config-if-ethernet2)# switchport access vlan 100
sonic(config-if-ethernet2)# no shutdown
sonic(config-if-ethernet2)# exit

# Configure Ethernet3 (PC2) - initially in VLAN 100
sonic(config)# interface ethernet 3
sonic(config-if-ethernet3)# switchport access vlan 100
sonic(config-if-ethernet3)# no shutdown
sonic(config-if-ethernet3)# exit

# Configure Ethernet4 (PC3)
sonic(config)# interface ethernet 4
sonic(config-if-ethernet4)# switchport access vlan 100
sonic(config-if-ethernet4)# no shutdown
sonic(config-if-ethernet4)# exit

# Save configuration
sonic(config)# exit
sonic# write


Step 9: Performance Verification
Phase 1: Layer 2 Switching Test
Objective: Verify wire-speed VLAN switching between PC1 and PC3 (both in VLAN 100).
PC Network Configuration:
- PC1: IP:
10.0.1.10, Mask:255.255.255.0, Gateway:10.0.1.1, DNS:8.8.8.8 - PC3: IP:
10.0.1.11, Mask:255.255.255.0, Gateway:10.0.1.1, DNS:8.8.8.8
Run iperf3 Test:
# On PC1 (server)
iperf3 -s

# On PC3 (client)
iperf3 -c 10.0.1.10 -t 30
✅ Expected Result: ~950 Mbps throughput (line-rate 1GbE)
This confirms Layer 2 switching performance within the same VLAN.
Phase 2: Layer 3 Routing & NAT Test
Reconfigure for inter-VLAN routing.
# Move Ethernet3 to VLAN 200 for inter-VLAN routing test
sonic# configure terminal
sonic(config)# interface ethernet 3
sonic(config-if-ethernet3)# no switchport access vlan 100
sonic(config-if-ethernet3)# switchport access vlan 200
sonic(config-if-ethernet3)# exit
sonic(config)# exit
sonic# write
Update PC2 network settings:
- IP:
10.0.2.10 - Subnet Mask:
255.255.255.0 - Gateway:
10.0.2.1 - DNS:
8.8.8.8
Test Inter-VLAN routing:
# On PC1 (VLAN 100) - server
iperf3 -s

# On PC2 (VLAN 200) - client
iperf3 -c 10.0.1.10 -t 30
✅ Expected Result: ~950 Mbps throughput
This confirms Layer 3 routing performance between different VLANs.
Test internet access:
# On PC1
ping 8.8.8.8

# On PC2
ping 8.8.8.8
✅ Expected Result: Successful ping replies from both PCs
Verify NAT translations:
sonic# show nat translationsThis displays active NAT sessions, confirming that internal IPs are being translated to the WAN IP.
Monitor Interface Statistics:
During iperf3 tests, monitor real-time interface statistics:
sonic# show counters interfaceYou should see RX/TX rates matching the iperf3 results (~1000 Mbps).
Troubleshooting
VM Won’t Boot or NICs Missing
Problem: VM boots but network interfaces aren’t available.
Solution:
# Verify VFIO driver is loaded
lsmod | grep vfio

# Check if NICs are bound to VFIO
lspci -nnk | grep -A3 "02:00"

# Should show: Kernel driver in use: vfio-pci
IOMMU Not Working
Problem: Error messages about IOMMU during boot.
Solution:
# Check if IOMMU is enabled
dmesg | grep -i iommu

# Should see: "DMAR: Intel(R) Virtualization Technology for Directed I/O"
# or "AMD-Vi: AMD IOMMUv2 loaded and initialized"

# Verify GRUB configuration
cat /proc/cmdline | grep iommu
No Network Connectivity
Problem: VM boots but can’t ping gateway.
Solution:
# Verify interface status
sonic# show interface status

# Check IP configuration
sonic# show ip interface

# Verify default route
sonic# show ip route

# Ensure physical cables are connected
# Check that WAN cable is plugged into correct physical port
Low Performance
Problem: iperf3 shows significantly less than 950 Mbps.
Solution:
- Verify PCI passthrough is active (not using virtio-net)
- Check CPU allocation (minimum 4 cores recommended)
- Ensure host system isn’t under heavy load
- Verify network cables and switch ports support gigabit speeds
NAT Not Working
Problem: Internal PCs can’t access the internet.
Solution:
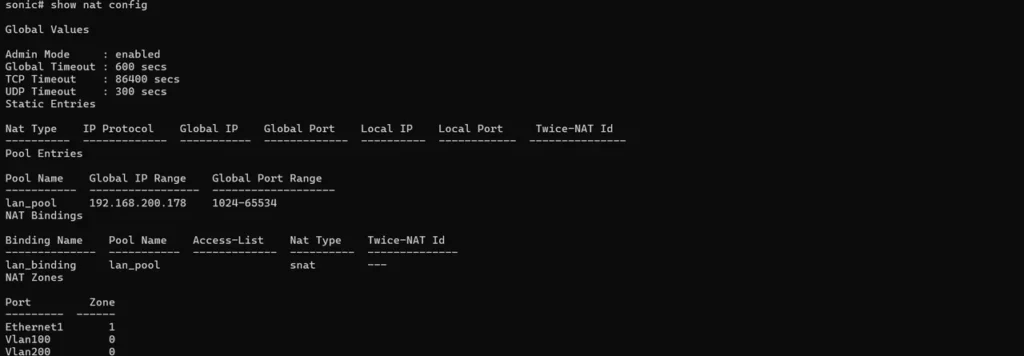
# Verify NAT is enabled
sonic# show nat config

# Check NAT pool configuration
sonic# show nat pool

# Verify NAT bindings
sonic# show nat bindings

# Confirm zone configuration on WAN interface
sonic# show running-config interface ethernet 1
PCI Addresses Changed After Reboot
Problem: Interface names don’t match after system reboot.
Solution:
- PCI addresses can change if hardware is added/removed
- Always verify interface mapping with
show interface status - Update QEMU/virt-install commands with correct addresses
- Consider using PCI slot persistence in libvirt XML
Summary
Congratulations! You’ve successfully deployed a production-ready virtual router.
What You’ve Accomplished:
✅ AsterNOS-VPP VM running on Ubuntu/KVM with hardware acceleration
✅ Wire-speed VLAN switching (950+ Mbps on 1GbE)
✅ Inter-VLAN routing at line rate
✅ NAT gateway with internet access for internal networks
✅ Production-ready virtual router on standard x86 hardware
Key Takeaways:
- PCI passthrough eliminates virtualization overhead, delivering near-native performance
- AsterNOS-VPP combines SONiC’s robust control plane with VPP’s high-performance data plane
- Standard x86 hardware can achieve enterprise-grade routing capabilities
- The same configuration scales to multi-gigabit deployments with appropriate hardware
Performance achieved on commodity x86 hardware demonstrates that AsterNOS-VPP delivers enterprise networking without specialized equipment.
Support & Resources
Need help? Contact our support team or join our community forum.